Monday, March 23, 2020

I Put That S#*t On Everything!


I do love me some Buffalo sauce. Back in my carnivore days, Buffalo Wings were one of my favorite football day snacks. But now, I don't eat meat. I mean, every ONCE in a blue moon I will have a bite of chicken or beef if it is locally farm raised, but I don't really crave meat at all anymore.

I do, however, still love Buffalo sauce. So, when the geniuses who decided cauliflower was a good substitute for absolutely ANYTHING came up with coating cauliflower in batter, baking it and tossing it in Buffalo sauce just like wings, I said, "Jen, you've got to try making this."
There are a bunch of recipes out there where you just bake the florets and then toss them in the sauce, but I really wanted some kind of coating, because, if you have ever roasted cauliflower, you know it doesn't get crispy, it gets mushy and falls apart. So I found a recipe and changed it a bit. Holy cow was it good!

I wish I had thought of photographing the entire process, but as we go on with the other recipes, I will. Meantime, this recipe is very easy to follow.

Grab a head of cauliflower and cut it into bite-sized, but not too small, florets. Mine were basically two-bite size. Preheat the oven to 450, and line a sheet pan with parchment paper.

In a bowl, combine the following:

1 cup unbleached white flour
1 tsp. paprika (I used sweet smoked paprika for a little smoky goodness)
1 tsp. garlic powder or granulated garlic
1 tsp. kosher salt or sea salt
a couple grinds of fresh black pepper
1 cup unflavored oatmilk (yes, you can use moo-cow milk, but I like the consistency of oatmilk. Plus, I don't drink cow juice)

Whisk well until you get a smooth consistency. 
Add the cauliflower florets to the batter, and coat well using tongs. Place on the lined sheet pan, leaving room between pieces. Bake for 10 minutes, flip with a spatula, and then bake for 10 more.
While it's cooking, wash and dry the batter bowl.

In a glass bowl or measuring cup, combine:
1/4 cup hot sauce (Frank's. It's simply the best for this.)
1-2 Tb. butter (everything's better with butter. I am obsessed with Kerrygold)
1 Tb. honey

Microwave 30-45 seconds, then whisk to combine. Put the sauce into the clean bowl.
When the cauliflower is finished, add it to the bowl and toss to evenly coat.

I don't usually buy blue cheese dressing, so I mixed Gorgonzola crumbles into ranch dressing and used that. No regrets on that choice! It was crispy, hot, and delicious!

Make it. Take a picture. Post to Food Happens. And enjoy, even though there's no sports to watch while eating.


Quarantine Cuisine


I guess it's time for me to sit back down at the keyboard and start blogging again, huh? I mean, I really have no excuse anymore, do I?

How have you all been holding up? I have officially been "furloughed" as of today, so I will be posting pretty much everything I make. I managed to load up on as much fresh ingredients that would fit in the fridge. When that runs out, I will start digging way back into the pantry to see what's been lost back there.

Before I move on to the recipes and pictures, let me pause for a moment and say that I actually wrote an entire cookbook (never published) that would be perfect for this situation. The principle behind the book (and my whole theory of creating great food whenever you want) is to have a supply of certain things in your larder and freezer that are the building blocks. In a normal world, you would buy the fresh produce and meat/fish/poultry as needed. Or have the meats stocked up in your freezer, and just pick up the veggies. Since we are in the Upside Down these days, things are considerably more difficult. But we shall overcome.

So here's the deal. I am going to post entries from the never-seen-the-light-of-day cookbook on here every day. Then, what I'd really like is for all of you to make some of the recipes, and post pictures of them on my Food Happens Facebook page. Let's make this a family thing.


Sunday, July 14, 2019

Tomater Dei

I wait all year for tomatoes. Real tomatoes. From PA, Jersey, Delaware and Maryland. Red, ripe, juicy and delicious. I feel sorry for those of you that have never experienced the glory of one of these beauties. From the fancy trappings of a Caprese salad, with fresh basil and locally made fresh mozzarella, to the simple perfection of a tomato sandwich, the bread of your choice, a light smear of mayo, big slices of tomato and salt. Ahhhh…

If you grow your own maters, you know that quite often you are faced with some big green ones. Yes, you can wait for them to ripen, but why not pick them now, and make yourself a special treat-

Fried Green Tomatoes. Yes, they are real, not just the title of a movie. And you don't have to go down south to have them. Although you can't find green tomatoes at the supermarket, you can ask for them at your local farm market or stand. (or your neighbor's garden)

Fried Green Tomatoes are easy to make, but do require some prep time. Wash them, then slice them. Not too thinly, though, or they will turn to mush when you cook them.
Then you need to set up what we in the business call the dredging station. Flour, egg, crumb. I use King Arthur Flour, but that's a story for another day, another post. I don't season my flour. I season the egg. I use sea salt, pepper and chopped basil in my egg mix. When you bite into the tomato, you get that little surprise of basil flavor. The bread crumbs are just plain. No seasoned, and no Panko crumbs here. Here's what the setup looks like:


Now here's the big secret about dredging: Use one hand for the wet, and one for the dry. So, here's how I do it. I pick up a tomato slice with my left hand and put it into the flour. With my right hand, I sprinkle some flour on the top, then flip it over so both sides are coated with flour. I pick it up with my right hand, then place it into the egg mix, being careful not to get my fingers in the egg. Using my left hand now, I flip the slice to coat it with egg, then pick it up and place it into the crumbs, again, attempting to not get crumbs onto my eggy fingers. Right hand now- put some crumbs on the top, then flip it over to get all coated with crumb, then gently put onto a waiting tray or plate. If you're lucky, you can get all of your tomatoes breaded without forgetting which hand is wet, and which is dry. Yeah, good luck with that. Most likely, you'll have goop stuck to both hands. It's all good. No judgement here. Remember, it's just food.

Now, it's time to fry. And by that, I mean pan fry, not deep fry. If you have a cast iron pan, now's the time to break that sucker out. They heat so evenly. They're wonderful. Unfortunately, mine is not big enough for this task. I would be frying for hours, so I used my super duper nothing sticks to me I got it on the internet pan. I use grapeseed oil to fry. It heats nicely, and has no taste. You can use an olive oil if you want, but not extra virgin. It will smoke if you get it too hot and turn bitter on you. Save it for drizzling over the tomatoes when they're done, if you want the flavor. As for canola oil, well, read my post about that. Blechhhh.


Let them get nice and brown and crispy. If you are making a bunch of them, you can reheat them right before you serve. But not for too long. You want them to stay a little crunchy on the inside.

As for serving them, well, there are myriad ways. You can do a mayo/aioli type sauce, a drizzle of good olive oil and aged balsamic, or pretty much anything else. I had some really nice, locally made fresh mozz in the fridge, so I sliced it and layered it between the tomatoes, then drizzled with some homemade pesto. It could have been a meal in itself, but I used them as a side for our Beyond burgers. I think I'll write about them next...


Don't let tomato season pass you by without trying Fried Green Tomatoes. Have I steered you wrong yet?
Until next time-enjoy summer. Corn, tomatoes, fresh produce. MMMMM...


Monday, April 15, 2019

Cope with This

Any of you ever seen this stuff before? My guess is no. But if you have, yay for you!
This, my friends, is Cope's Corn. It comes two ways: canned (rehydrated) or bagged (see above).
I was introduced to this corny wonder by my first boss, who, incidentally, looks a bit like the dude on the bag. (Tracey, you know who I'm talking about!)

Ok, ok, I'll explain it to you now. As the bag says, this is toasted dried sweet corn. It tastes different than any other corn you have ever eaten. This is Lancaster County, PA corn. At the moment it hits the height of its sugar content, it is picked and then immediately dried. Those sugars caramelize in the heat, and that is what gives it the unique brown color you'll see. Once you reconstitute the kernels, the corn has a nutty, sweet flavor. 

The Cope's Corn Company was founded by Martin Cope in Manheim, PA (near Lancaster) in 1900, when the first batch of corn was dried over a coal burning stove. Martin named the product for his grandson, John. For over 100 years, the company stayed in the family, but in 2006, was sold to Hanover Foods. 

Cope's Corn, for those who love it, is a family tradition for holiday meals, especially Thanksgiving. Brand loyalty is easy-they are the only game in town! Most of the traditional recipes are for corn puddings, creamed, baked and stewed corn. It can also be reconstituted and used in cornbread.

When I had my restaurant, State Street Café, back in the '90's, I knew I wanted to do something with this sweet, toasted wonder, but not the usual side dish. So I soaked it, then cooked it with vegetable stock, thyme sprigs and shallots, removed the aromatics, pureed slightly and finished with a little butter to make a sweet corn sauce. I served this under my famous (well, in certain circles they are, and that's only because YOU haven't tried them yet) Crab Cakes. 
Mmmm….I can taste it now....

You  can find Cope's Corn in most supermarkets in PA, but it's also available online from various retailers. If you are a corn lover, give it a try. I promise, it will be like no corn you've ever had. 

Enjoy, and let me know what you think. Until next time...

Saturday, January 19, 2019

Penne For Your Thoughts

Have you ever wondered what the difference is between the pasta on the market shelf that costs $1.00 and the one that costs $3.00? Oh go ahead, say it, you know you want to. Duh, Jen...price.
Well, yes, my little Mensa friends, but WHY does one pasta cost significantly more than the other?
Is it the packaging? The name brand? The number of curlicues per square foot?

It's two things, actually: the wheat used to make the flour, and the machinery on which it is cut. Let's look at both of these factors individually.


Every heard of Durum wheat? It's what's called a "hard" wheat, which means it contains more proteins than soft wheat, especially gluten. When ground, durum wheat becomes semolina, and durum flour, the only two dry ingredients used in Italian pasta. Semolina flour helps the pasta stay firm when cooked, and is also higher in protein than all-purpose flour.

Good flour and pure, clean water. These are the first two ingredients to high quality pasta.

Now, let's talk about cutting this good quality pasta dough. Pasta is cut by machine, using "die".
Remember that Play-Doh set with the extruder? You could change the plates and make different shapes. Well, pasta machines do pretty much the same thing. Each die produces a different shape, when the pasta dough is pushed through them. As the shape comes out, a blade spins and cuts the noodle at the desired length. Long cuts, like spaghetti or linguini, are great for olive oil based sauces, or full-bodied tomato sauces. Short cuts, like penne, rotini, or farfalle, are better for chunky ragus or vegetable sauces. The last group are the soup cuts. These are the little guys, like ditalini, or acini di pepe. They go best in soup, or as a side dish.

So now, we've got the good pasta dough, and the machine with the die. But wait, there's more. There are two types of die; those that are made with a Teflon coating, and those that are made of bronze. And here, dear readers, is where the main difference in quality comes in.

Teflon, as we all know, is a nonstick surface. When die are coated with Teflon, the pasta dough slides through quickly, easily, and cleanly, which makes it ideal to produce massive amounts of macaroni in less time. However, because it slides through so easily, the surface of the noodle is smooth. Now, that looks nice, but when the pasta is cooked and tossed with sauce, the sauce won't cling to the noodle. It just slides off. (This is where you conjure up memories of the spaghetti you had in the school cafeteria when you were a kid.) Are you now saying to yourself "wow, now I know why I can't get the sauce to cling to my pasta?" Good for you!

Now, pasta that is pushed through the bronze die takes more time to produce, since it has to go through more slowly than if it was passing through the Teflon. Going through bronze leaves a rough surface on the noodle. When cooked, these little nicks on the surface hold the sauce onto the pasta.
Voila!


Oh...you thought I was finished with the story? NOPE. One more piece to the puzzle. THEN I'll stop talking.

Let's review: Quality ingredients=better pasta. Teflon=slippery noodle. Bronze=rough surface, holds sauce. Got that so far?

 The last, but not least, important factor to quality pasta is how the noodle is dried after it is produced. Most of the mass produced, Teflon extruded, lower quality pasta is dried quickly, at hotter temperatures, usually between 140-190 degrees. At 140, the starch molecules open, and you get what is called the "Maillard Reaction". This is a culinary term for the chemical reaction that happens when food begins to brown or toast. This is why the cheaper pasta often looks more yellow.  This  makes it attractive to the eye, but, when cooked. loses flavor, and because some of the original water is left in the noodle, overcooks more easily. (Again, cafeteria spaghetti)

Bronze cut pasta is more likely to be slow dried, at temperatures closer to 104 degrees. This takes much longer, up to 30 hours, but the pasta retains more of the nutty flavor and aroma of the durum wheat. It's also much lighter in color than the quick dried stuff, but it makes it much harder to overcook. If properly cooked (al dente), you will get a tiny white spot, right at the center of the noodle, which is sometimes called the "white ghost". The pasta remains firm, the sauce clings to the surface, and all is right with the world.

Let's tie this whole thing up, shall we? Seems like an awful lot of talking about macaroni!

Good pasta begins with quality ingredients, is pushed through bronze die, and is dried slowly. Ergo, it tends to cost more. Have you tried any? It's totally worth it. Give it a go sometime.

Thanks for your time. Hope you learned something useful. I mean, that's what I strive for here on these pages. I'm going to get back into posting more often. It feels good to write again.

Now go get some good pasta and get cooking!


Saturday, July 29, 2017

New Beginnings

Hi. Been awhile, I know. I've been busy, ok??
Sorry. Lousy excuse. I spent a large portion of my unemployed period doing..I have no idea what I was doing. Lisa got me started walking dogs with her, and I liked it. I got a job. It was very corporate, and I didn't like that. So I tendered my resignation, and decided to become a full time employee at Animal House. I walk dogs, scoop poop, feed dogs and cats, and otherwise perform tasks that were never part of either my studies at Georgetown or my culinary training.

But you know what? I am tan, getting fit, and really, really HAPPY. Yes, there are days when we have too many dogs sleeping over (last night we had 9) and some have accidents in the house, but we realize that we are doing something that makes us, the pets, and their owners happy. So we slop up the mess and move on. It's really hard to stay angry at dogs. They are all cute and wonderful.

What's that you say? Am I still cooking at all? Well, YEAH. I am doing a couple of things to keep my cooking chops up. The first thing is that I am doing some parties with a guy I met through Facebook named Paul Cullen. He lives down near the beach in Delaware. Used to be in the band Bad Co. playing bass. Nowadays, he's got an Italian food and wine business, where he comes to you house, creates a three course meal, matches wines, and then sets up his amp and entertains with his guitar while you enjoy your wine. I get to help him in the kitchen. (he doesn't let me sing with him, which is probably a wise choice.) We work very well together, and I am really enjoying when I get to do gigs with him. Hopefully, there will be many more in my future!
Here we are, making some beautiful food:

I'm still planning on teaching at Montco in the fall, too. You all know I love to teach.

Then...Lisa and I got this great idea. What if we offer a service to our pet clients where we have meals ready for them when they get home from vacation, or the work trip? I can shop, cook, and package everything, so no one has to worry about cooking when they finally get home. Great idea, huh?
I am also going to start doing some cooking class/parties. Grab a few of your friends, a couple bottles of wine, and I will come to the house, teach you how to make some awesome grub, and provide recipes. It's a really fun way to spend time with your friends. It can be dinner, or lunch, or whenever. 
I'm working on my website, which will link this blog, my Facebook page, and the site all together. It will have all the information you need to keep up with me, book a party, order some food, or just see some beautiful food pics and find some recipes. I will make a big announcement when it's ready to go. 
Look for another post very soon. I'm going to do some cooking this week, so hopefully there will be something good to talk about. Thanks for sticking with me. Great things on the horizon!
Go buy some tomatoes, some corn, some local produce before it's too late. Shop local, eat local, kiss a farmer and all that. 
Namaste, my friends.

Thursday, March 16, 2017

Using my Noodle

Big snowstorm coming. Everyone puts on a pot of chili. They also go and buy up all the bread, milk and eggs, as if these will magically disappear, and they must eat French Toast before they surely freeze to death. But I digress. Back to the chili. The chili I didn't make.

In an attempt to amuse myself while barely surviving this period of unemployment, I spent some time wandering the aisles of one of my favorite places to kill time, Assi Market. This is a Korean market that also specializes in amazing fresh produce, fresh, AFFORDABLE cut to order seafood, and about every Asian grocery item you could imagine. There is also a spot that sells small wares, in case you decide you suddenly need a set of matching chopsticks or a rice cooker. AND they have a food court, with, as you can imagine, some of the freshest food around.

Back to the snowstorm. I didn't want to make chili. I wanted to keep it lighter, and do something new.
So I bought a sixpack of ramen noodles, some dried shiitake mushrooms, a pack of fried tofu, and bean sprouts. I had miso in my fridge, and plenty of other seasonings at home. I also had some wild salmon filets in the freezer. See the plan coming together yet?

When cooking with ramen noodles, always follow this important step 1. Open the wrapper, break the noodle block into pieces before cooking, and THROW AWAY THE SEASONING PACKET. Have you ever looked at the sodium count? Yikes!

Let's see if I can remember the steps in order...
Cook the ramen in boiling water until soft, drain, rinse in cold water and set aside.

Soak the mushrooms in hot water until soft. Remove the stem and slice into strips. Or whatever other shape you fancy. Don't throw that soaking liquid away! Pour it through a coffee filter (to grab any dirt that may have been on the mushroom) into a small sauce pot. Use this as the base of the miso broth.

Miso is really easy. Since I had the mushroom liquid, I added a bit of water and whisked in some miso paste until I like the flavor.

Salmon filets have been thawing. I marinated them in a little sesame oil and soy. Then I broiled them. (heading outside the grill is not an option at this time)
I diced to tofu small, and rinsed off the bean sprouts. I blanched a couple asparagus spears I had.

Then I put it all together. The salmon was topped with a shake of my sesame/seaweed rice seasoning, and I swirled a bit of Sambal Oelek into the broth for a little heat.

No disrespect to chili, but geez, this was good. And easy. And not expensive. And pretty. And..ok I'll stop tooting my horn and post a picture.


Next time I'll show you the awesome Indian food I made last night.

Peace.


Sunday, January 22, 2017

Open Sesame

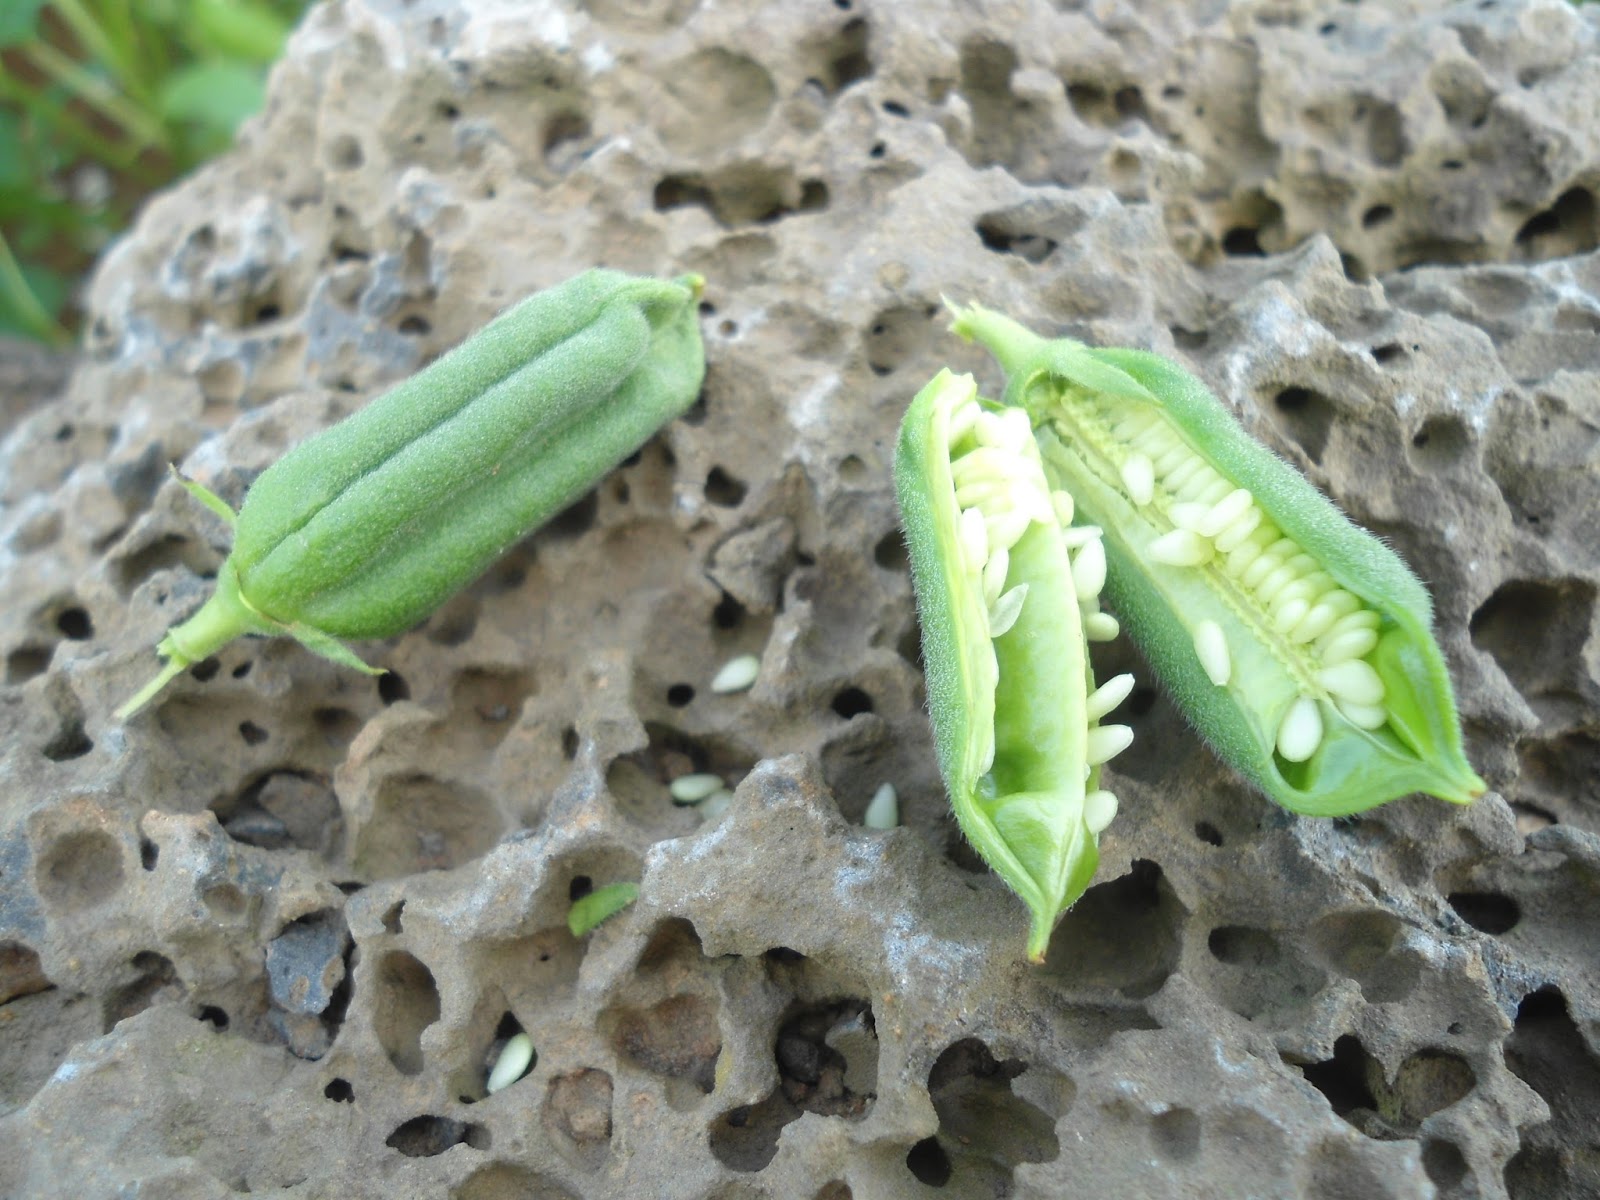
In an effort to keep from thinking about politics 24/7, I try to allow my brain to meander through the mundane. And during one of those travels in the trivial, the ol' thinker came up with this one:

"What does a sesame seed grow into?"

Then of course, I wondered why it has taken me so long to wonder that. Of course, the research commenced. So, if you never wondered or just really don't care what a sesame seed grows into, time to go back to CNN, or FOX, or wherever you get your political news fix and get back to being agitated.

Sesame is a flowering plant, native to sub-Saharan Africa. Wild relatives of the plant can be found in India and the Middle Eastern countries. It is now primarily cultivated in China and India, who supply most of the world with these little edible seeds that grow in pods on the plant. Sesame's ability to grow both in drought or monsoon conditions has made it a sustenance crop for poor farmers throughout history.

Sesame is one of the oldest oilseed crops, having been domesticated over 3000 years ago. It has the highest oil content of any seed.

An annual plant, sesame sports tubular flowers, that can be white, yellow, blue or purple. The seeds can also be different colors, from white and tan, to brown, red and black. The seeds are found in a fruit capsule, which when ripe, will naturally split to reveal the seeds, growing in lines. When the split capsules are as dry as possible, the seeds will be harvested, cleaned and hulled.

Sesame seeds appear in cuisines worldwide, and in many different forms. In the Middle East, seeds are ground into a paste called tahini, which is a key ingredient in hummus, and the sauce that tops falafel. In Greece and Sicily, cakes and cookies are made with ground sesame seeds, or topped with them. They show up in Indian, East Asian and West African cooking. The sesame, or as the Africans called them-benne-seeds were brought to America through the slave trade. To this day, benne sticks and benne cookies are staples in South Carolina. They are also found topping burger buns and bagels.

The biggest importer and consumer of sesame seeds, however, is Japan, where they are used in so many ways. They top sushi, salads and snacks, but the most popular use is as sesame oil. Toasted sesame oil is a staple of Japanese cuisine. It is mostly added at the end of cooking to avoid flavor loss and to keep from smoking and tasting rancid. Sesame oil is high in vitamins B1 and E, magnesium, copper, calcium and iron. It is also a source of fiber and good fat.

So now you know the story behind the lowly sesame seed. I know I feel better having this knowledge. And as a parting gift, I shall leave you with a recipe for Benne Wafers. You're welcome.

Benne Wafers
Preheat oven to 375. Line sheet trays with parchment and spray with nonstick spray.

1 c. toasted sesame seeds
3/4 c. melted butter
1 1/2 c. light brown sugar, packed
1 egg, beaten
1 tsp. vanilla extract
1 c. all purpose flour (I like unbleached)
1/4 tsp. salt
1/4 tsp. baking powder

The easiest way to toast sesame seeds is to place them in a sauté pan and heat over medium heat, swirling constantly, until evenly browned. Remove and cool before using.
Combine all ingredients well. Drop by 1/2 teaspoonful onto prepared pans, leaving room between cookies. Bake for 5-6 minutes, or until just browned at the edges. Allow to cool. They will be very flat and crispy.

SAYS-A-WHO? SESAME!!

Tuesday, January 10, 2017

Keeping My Head Above Water

So, it's a new year, I am without a job, and I'm trying desperately to find something good to talk about. I haven't been cooking anything too spectacular, mostly bean stews and pasta. It's that time of year where all I want to do is braise things, make soup, and try to stay warm. In fact, I think once I'm finished here, I'll get back under the blankets and cover myself in dogs. We have four now. I know that sounds like too many, but they're pretty small. They bring a lot of joy to us. And so do the cats, I don't want to leave them out, but they're just not as snuggly.

My wife, Lisa, has a pet sitting/dog walking business, and for the holidays, I thought it would be nice to make some gifts she could give her clients. For the humans, I made some really rocking granola. It started as "hmm, what do I have in the house so I don't have to buy a whole bunch of stuff", then grew, as I realized a) how many clients she has (yay!) and b) how stinking good the granola was. Most people like granola, but don't take the time to make their own, thinking it will be difficult or time consuming. So they pay high prices for store bought stuff. Let me tell you, it's not hard to do, and home made always tastes a little better. Being the milk of human kindness that I am, I am going to share my recipe here. Ready?

My oven only holds two half sheet pans, so this is what I wrote the recipe for.

1/2 large canister rolled oats (you can use quick or original, but not instant)
2 cups sliced almonds (I use the unbalanced ones, I like the color on the skins)
1 cup unsalted sunflower seeds (shelled, please)
1/4 cup flax seeds
1 cup coconut oil
1 cup light brown sugar
1/2 cup honey (organic, if you can)
1/2 tsp. kosher salt
1/2 tsp. cinnamon
1 tsp. pure vanilla extract
2 tsp. almond extract
dried cranberries, or other dried fruit of choice

Preheat the oven to 325. Line 2 cookie pans or half pans with parchment and spray very lightly with nonstick spray.
Combine all dry ingredients (EXCEPT CRANBERRIES) in a large mixing bowl, and toss to mix.
Combine oil, sugar, honey and extracts in a small sauce pan, and heat over medium until melted together, stirring with a whisk.
Spray a rubber spatula with nonstick spray and use to scrape all of the sugar/oil mixture into the dry mix. Coat and combine thoroughly with the spatula. Divide the mix between the two pans and press down to form an even layer of granola.
Bake for 24 minutes, spinning the pans halfway through the cooking process.
Allow to cool on pans, then break apart into a large bowl and add cranberries. Store in an airtight container.

I also made dog biscuits. Peanut butter and pumpkin biscuits. They were pretty easy, too.

5 cups whole wheat flour
4 eggs
1 can organic pumpkin
1/4 cup peanut butter
1 tsp. cinnamon

In a stand mixer, using the paddle attachment, combine all ingredients. Turn out onto a board or table and roll to about 1/2" thickness. Cut out shapes using a cookie cutter. Bake in a preheated, 350 oven for about 40 minutes, until hard. Cool thoroughly before storing,

Everyone love the gifts. We bagged them up and made cute little ingredient labels. The best part, though, was all of the calls asking if the granola was for the dogs or the people. Sigh..

So that's pretty much what I've been up to. Try these recipes. Even if you don't have a dog, make some for someone who does and give them a gift. Or donate them to a rescue. You'll be a hero, at least in my eyes.

Send me good vibes in my job search, people. Please. And I'll keep looking for things to talk about. All my best wishes for a great start to a great year.
Peace.


Wednesday, September 28, 2016

Oh, Those Summer Nights

It happens every year. The summer comes to an end, and I have to say goodbye to all of the wonderful foods I wait almost 9 months for. (I just ended a sentence with a preposition, and I totally don't care right now.) The colors, textures, odors, and flavors of summer make me so happy. Bright reds and yellows, vibrant purples and greens, even little white eggplants. They smell like summer. They are fresh and crunchy. Raw, steamed, grilled...let me at those summer vegetables!
Being that my parents live on the Chesapeake Bay, there are also some other treats to savor. Like those Callinectus Sapidus-the wonderful Maryland Blue Crab. They are truly the beautiful swimmers of the bay. I had the pleasure of not just one-but TWO-crabfeasts this summer. Steamed spicy hardshells, local corn and tomatoes, and good beer. I wish I could share that experience with all of you that have never had it. Maybe the next blog site will have a "scratch and sniff" setting. Look at that beautiful thing!
I also got to make softshell crabs for dinner one night. For those of you who have no idea about what I speak (there, proper sentence structure), a crab has to molt-shed his or her shell-to be able to grow. It's really cool to see happen. Go google "molting crab" to see how they do it. Anyway, when they shed the shell, they are entirely edible. As they grow the shell back, it becomes harder to eat. This is a stage called "papery". They are still alive when you get them, and unless you are buying them prepared in a market, you have to commit their little souls to heaven and kill them yourself. I have prepared so many softshell crabs in my lifetime, but I have apologized to each and every one and said a little prayer for them. When I owned a restaurant, back in the '90's, I would serve softies every weekend of the summer season, prepared differently each time. I had customers who would call and reserve them so I wouldn't run out before they got there. It was a rare treat if there were any left at the end of the weekend. If there were, I would cook them up and we (the staff) would get to enjoy them. Softies are easy to cook. I prefer them sautéed, as opposed to deep-fried, although a fried softshell po'boy is a beautiful thing. You have to be careful when you cook them, though. They are basically balls of water being held together by a tiny bit of "skin". Know what happens when water starts to boil in oil? KABOOM. It's like flying shrapnel sometimes, so be aware if you are making them at home. Unless you like scars.
Here are my  beautiful softshells:
Fresh tomato slices on the bottom, basil-shallot beurre blanc on the top. Ermigard...

I guess it's time to start thinking about cooler weather foods, although the tomatoes and basil will keep coming for a few more weeks. The weather has finally started to cool off here, so I can turn my thoughts to chili, soup, and root vegetables. The Jewish holidays are upon us, so braised brisket and chicken soup beckon. Maybe this year I won't be as sad to see summer go. As soon as the winter solstice hits, I can start counting down to my long, sunny days and warm, starlit nights.
On that note, I think it's time for me to sign off and go make one more arugula salad with local tomatoes, cucumbers and fresh mozzarella, with dressing made from herbs in the garden. Sounds like dinner to me!
Eat well, and I'll see you soon.

Thursday, July 28, 2016

It Does A Body Good.

Hey. How ya doin? How's your summer? It's been awhile. I hope you've all been eating well and enjoying life. I've been busy, but that's a lousy excuse for not blogging. Let's see if I can catch up.

So, I've been promoting local purchasing and farm to table initiatives at work. We have gotten a new school account, and I managed to convince our VP of purchasing that it was possible to buy local and not have it affect our bottom line too much. The new school is right on the Hudson River, near NYC. That gives us a pretty good range to consider as regional/local. We had the opportunity to do some farm visits and learn about the small farms that are still in operation in the Hudson River Valley and out on Long Island. It was an amazing trip, and I wanted to share a little of what we got to experience with you all today.

First, there is Hudson Valley Fresh, a dairy cooperative dedicated to preserving the farming heritage of the area. They support sustainable farming, the preservation of over 5000 acres, and provide a living for a select group of small farms that meet their stringent standards. The organization was founded by Dr. Sam Simon, a retired orthopaedic surgeon who began life as a dairy farmer, and returned to his roots. Everything about HVF is top notch. They set the standards for quality and freshness. They ensure that their cows are healthy, comfortable and well fed. Their motto is: More comfort+less stress=better tasting milk.

And let me tell you, this is some good tasting milk! I am lactose intolerant, so I only tried a sip of the chocolate milk, but...OMG this stuff tastes like a milkshake made by angels! My travel companion vouched for the quality of the whole milk, and we did get to try some of the yogurt, which was also delicious. The best part of the visit, though, was having the chance to see one of the farms and meet not only the farmers and their family, but the cows. Jim and Jen, and their children, Jenna and Justin, welcomed us onto their farm and introduced us to their herd. Getting a chance to talk to people whose love for animals and the land was inspirational. I have such respect for these folks, and am honored to have had the opportunity to meet them. And the cows.

If you ever find yourself in the Mid-Hudson Valley, Long Island, New York City or select parts of Connecticut, and see Hudson Valley Fresh Milk on the grocery shelves, grab some. Especially the chocolate milk. I kid you not. It's da bomb. Visit their website: www.HudsonValleyFresh.com to learn more than you ever thought you wanted to know about dairy farming and milk.

That's all for today, kids. I'll give you the rest of the farm tour next time, when we go out to Long Island and visit some of the few remaining farms out there. Until then, be well, eat well, drink well.


Sunday, March 27, 2016

Me Gusta Mucha

A few weeks ago, Lisa and I had dinner at a Taqueria in Conshohocken, PA. Well, we tried. It was so crowded, we ended up getting takeout. It was the most authentic and delicious (and affordable) Mexican food I have had in memory. Nothing bothers me more than overpriced, mediocre Mexican food. Ok, maybe overpriced, mediocre Italian food. But you get my point. There is so little authentic ethnic food of any type around, it is wonderful when you find it.

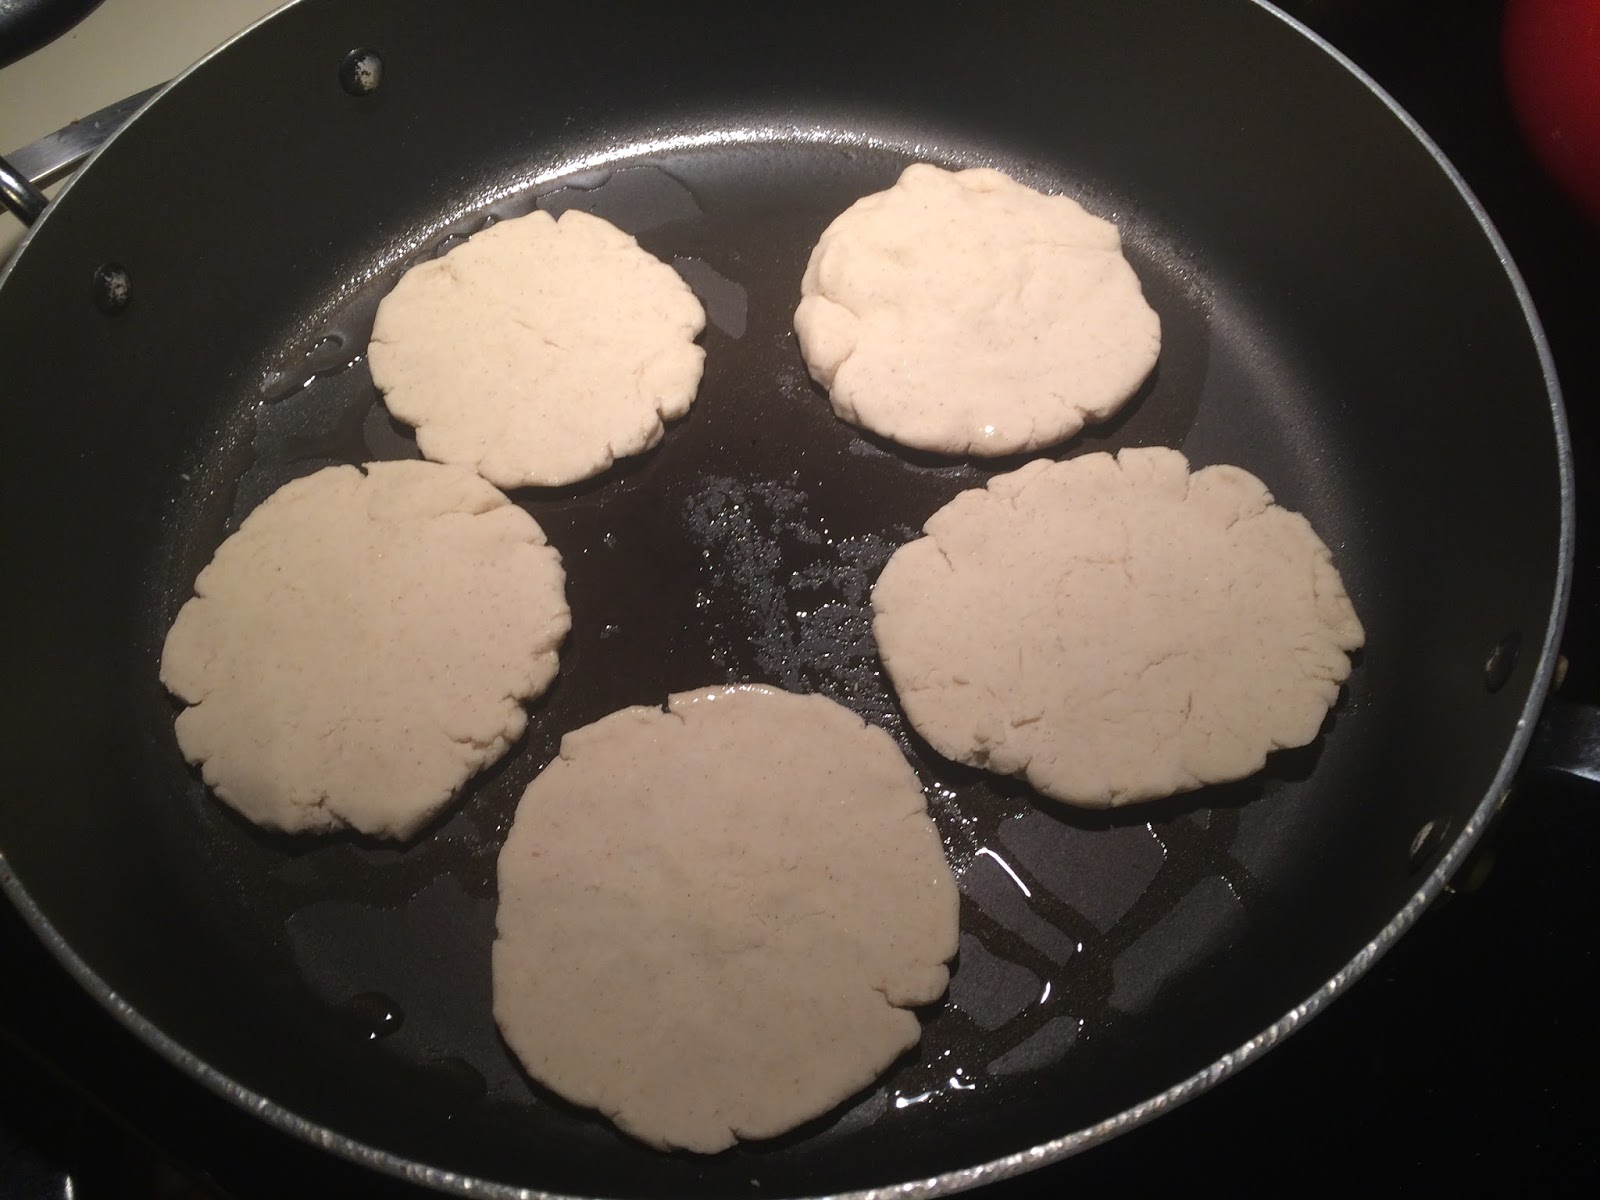
One of the dishes we got was Sopes. Sopes are little disks of joy, made from Masa (corn) flour and water. They're kind of like little, thick tortillas. You toast these little guys, then top them with all kinds of wonderful stuff. They were so good, I wanted to make them at home. Luckily, I have a market nearby that sells real Mexican items. I got the Masa, chorizo, canned tomatoes with chilies, and queso fresco.

Nicole and I decided to have a girls night, cooking together and watching a movie. She was into helping with this project. Let me tell you, this is one EASY dish to make. The recipe for the dough is on the back of the Maseca bag. Like I said, it's just flour, water and a pinch of salt. You make the dough, form balls, and pat them into disk shape. Then, they get toasted. If you have a griddle, that's really the best place, but I don't, so I use my all purpose fry pan.

Easy, no?
You just let them get a little crispy on both sides. While Nick was making the sopes, I cooked some chorizo, heated some refried black beans, and some canned tomatoes with chilies. We shredded some iceberg lettuce, crumbled the queso fresco, and brought out the sour cream ( which to Nicole and me is a food group all in itself). 
And whoot, here it is!

By the way, we watched "Pitch Perfect 2", a perfect movie for a mother-daughter night.
Next week, we're making these again, with some pulled chicken. They're also really good with no meat at all on them. We're going to make a bunch of them and keep them in the freezer for instant gratification snacks.
Go forth. Make sopes. Arriba!

Monday, February 8, 2016

Make Some Gumbo/Roux the Day

Laissez Bon Temps Roulez and all that! It's one of my favorite times of year to eat. I don't really need an excuse to make New Orleans food, but somehow, it's better at Mardi Gras time. And it's also some great Superbowl Sunday fare.

I'll be honest; the seed that grew the idea for this gumbo was finding a giant bag of frozen okra at one of my local stores last month. It used to be easy to find okra around here, but it seems like it has become a hard item to locate these days. It has migrated from the frozen vegetable case down into the frozen Hispanic items. Don't ask. I don't know.

Oh, and once upon a time, you could get gumbo file powder up these parts. File (pronounced feelay) is powdered sassafrass. It adds that certain "je ne sais pas" to gumbo.  I have a bottle hiding in the back of my spice cabinet for just these occasions. Some say it is the secret to the perfect gumbo.
I'm here to tell you the real secret to the perfect gumbo.

Ready?

It's the roux. Any self respecting cook or chef from Nawlins knows how to make a Cajun roux. The first ingredient is patience. There's no rushing the nutty smelling, tawny brown perfection that is the roux. In so many dishes, roux is used simply as a thickening agent. But Cajun roux is so much more than that. It adds flavor and color along with texture. No butter here. Oil and flour. Cook over medium heat. Stir. Stir. Stir. It gets golden, then darker, but not burnt. It starts to smell like toasted hazelnuts. Don't rush the roux.

The next "must-haves" for gumbo are onions and celery, diced small. Some recipes call for green pepper. I don't like green pepper, so I use a red pepper. You can use a mixture of peppers if you like. Stir the diced vegetables into the roux. Once they are incorporated together, add some of the file powder, some cayenne pepper, and salt.  Next, some Andouille sausage. I found some nice turkey Andouille, so I use that. Dice it up and toss it in. Chicken. I use boneless thigh meat, trimmed of fat and diced. I find that breast meat can get dry, but feel free to use it instead. Here's what it looks like at this point. (I forgot to take a picture of the roux cooking, sorry.)

See, there's the Gumbo file powder in the background. Ok, now add some chicken stock. Stir with a wooden spoon, getting all of the roux up from the bottom of the pan. Add some dried thyme and some tomato paste. Since I am a big tomato fan, I also use some diced tomatoes. Stir, let simmer for a bit, then add some of the frozen, diced okra. For those of you who don't know, okra is a vegetable. It is the seed pod of a plant which grows in the temperate climates, and is especially drought resistant, making it a staple of African food. It can be fried, pickled, sautéed, or sliced and used in gumbo. And here's the cool part of it. The inside of the pod contains a sort of "goo" that helps thicken the sauce, and the pod itself gives an nice snap if not too overcooked.

I put shrimp in my gumbo too, if I have it. And I did. So I did. But don't add the shrimp until later, or they will get dry and chewy. If you're feeling particularly regional, and can find them, you can put in crawfish tails. Not my thing. Here we are, a' simmering. Look at that golden color!

Now, the big decision. Do you put the rice IN the gumbo, or serve the gumbo on top of the rice? Is this REALLY the biggest decision you have to make today? I am completely ambivalent  on this one. Sometimes, I put it in, sometimes, if it's thick enough, I just put it over cooked rice. White rice. Brown rice. You pick. I used white rice this time.
Here's the finished product. We added some  Tabasco, because we like an extra kick. It was VERY good, if I must say so myself. I'd hold it up to a genuine New Orleans gumbo.
It's not hard. Seriously. Make some gumbo. Let the Good Times Roll.

Chef Cochon gives it the seal of approval. Enjoy your Mardi Gras. Or make it whenever you feel like it.
See you soon. I promise. No more lazy writer.

Saturday, October 31, 2015

I Heart Cauliflower

Cauliflower has become the new darling of the culinary world. People just keep discovering new and wonderful ways to prepare it, and I for one, couldn't be happier. I mean, I could eat oven roasted cauliflower florets for breakfast, lunch and dinner every day. But I have to give major props to those folks who are doing really interesting things with this cruciferous treat. I've tried a few; I've made cauliflower pizza crust (good, but a lot of work for a little pizza), roasted a whole head of cauliflower and cut it into "steaks" to use as the center of the plate for dinner, made cauliflower "rice", and the other night, I made an alfredo type sauce out of pureed cauliflower and potatoes. That's the one I'm going to talk about here, because it's going to be one of my favorite easy "go to" dinners from now on.

Let's take a look at cauliflower first, shall we? Image result for cauliflower
Pretty, huh? Wait, check out the Romanesco variety:
Image result for romanesco cauliflowerHow cool is that?
Cauliflower is part of the Brassica Oleracea family, which also includes broccoli, Brussels sprouts, cabbage, collards and kale. The vegetable dates back to the 6th century BC. It originated in the Middle East, and was brought to Western Europe in the 16th century. In the 1800's, the British introduced it to India, where it has become a staple of their cuisine.
Cauliflower is low in fat and carbohydrates, and high in fiber, folate, Vitamin C and Vitamin K. Studies are showing that it has both antioxidant and anti-inflammatory benefits. Also, since it is a good source of fiber, it helps support digestive health.
Oh, and it's delicious.

So, back to my "Alfredo" sauce. I took about a half a head of cauliflower, broken into florets, and two medium sized peeled and diced Idaho potatoes, a couple cloves of garlic and threw them into a pot. I covered them with vegetable stock and boiled until they were soft. Then, I pureed the whole deal, and seasoned it with a little salt, pepper and nutmeg. This all can be prepared in advance of the meal.
I cooked up some fettuccine. While that was boiling, I dipped a small strainer with broccoli florets into the pot to blanch them. When the pasta was done, I drained it (saving a bit of the cooking water) and dropped it into a big mixing bowl. I added the broccoli, enough sauce to coat, a little of the leftover pasta water to thin it a bit (this is optional) and some grated Parmesan and Asiago cheese. Tossed the whole deal around in the bowl with a pair of tongs until it was well coated, and rechecked the seasoning.
 
Now, I'm not going to say that it tastes like it has cream in it, but since I am lactose intolerant and don't eat true Alfredo sauce, I don't care. It DOES have a really nice, rich vegetable flavor. In fact, all three of us had seconds! It's vegetarian, but you can add chicken or shrimp if you like. Oh, and if you don't use all of the sauce, just heat it up and eat it for soup!
 
Yay cauliflower!